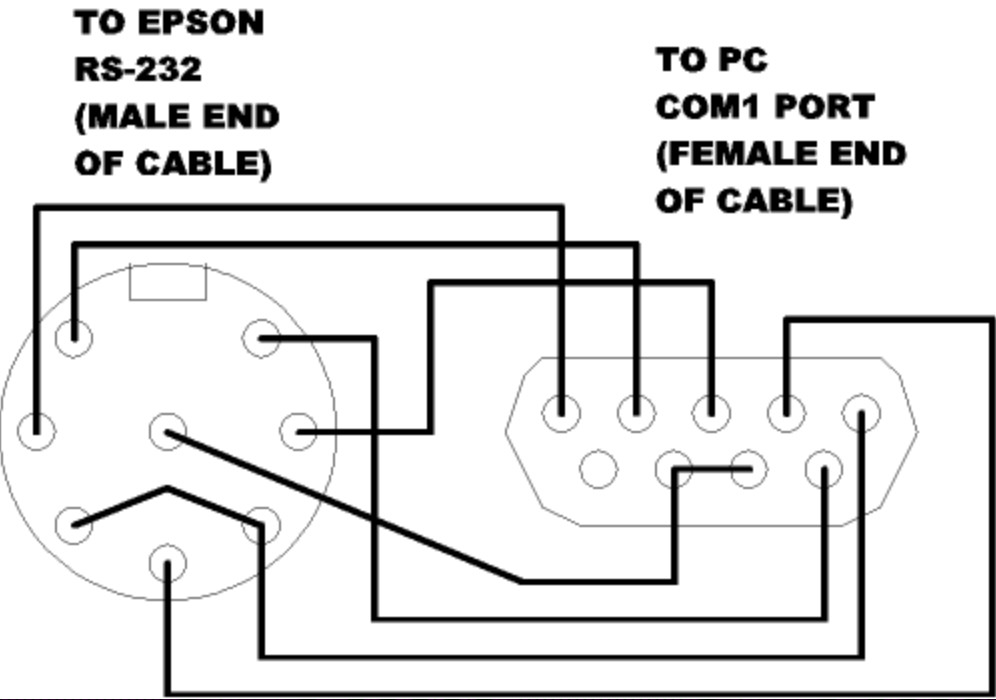
To bring the EPSON Laptop HX-20 back to life, we need to get software on it. One possibility is to transfer data from a PC with a serial cable. Unfortunately the HX-20 does not have a standard 9-pin RS232 connector, but only round DIN sockets for serial connections and a special pin assignment. Therefore we have to use a soldering iron and modify a standard cable. That this is not difficult at all, if you have a little soldering experience, I show here.
We take a 9-pin serial cable (no null modem) with at least one female connector (see picture). The second connector is replaced by a round 8-pin or 5-pin DIN connector. The RS232C socket of the HX has an 8-pin DIN socket, but since only 3 pins are occupied (see picture), you can also use a 5-pin DIN plug, as in my example.
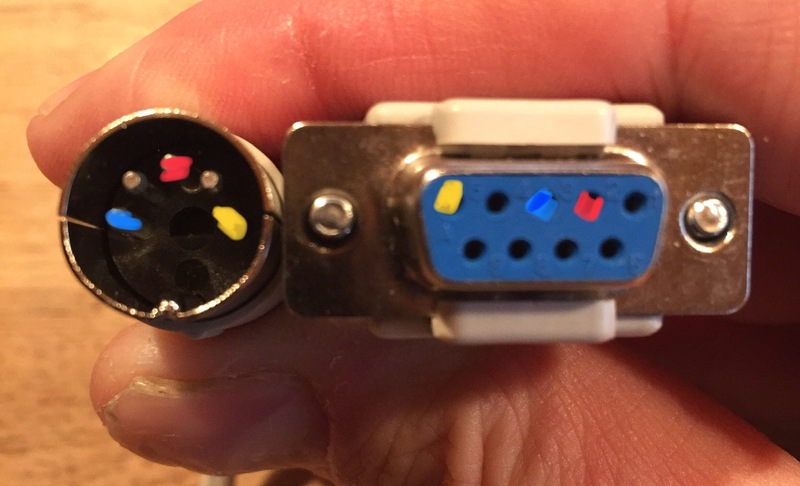
The 3-pin cable is easy to make, but has the disadvantage that it only supports slow transmission modes because it has no pins for flow control. See also here: http://oldcomputer.info/8bit/hx20/index.htm under “Loading from PC’s serial port”. Note that the picture there shows the computer side of the pinout – so it is reversed.
On the PC side we use a USB-serial adapter and connect the cable on the HX-20 with the RS232 port. Under Linux, a text file can then be transferred with the program minicom. In the internet you can actually still find many BASIC programs that can be downloaded for the HX. To configure the correct data transfer parameters, start minicom with the parameter -s and set the connection to 300 baud, 8N1, without hardware/software flowcontrol (save configuration as default (dfl)).
Afterwards you can select a file in ASCII mode with CTRL-A, S. With the HX-20 you start the serial transmission with the following command:

The general command syntax is as follows:
LOAD "COM0:(BLPSC)"
The meaning of the parameters BLPSC:
B is a number meaning speed:
0 – 110bps, 1 – 150bps, 2 – 300bps, 3 – 600bps, 4 – 1200bps, 5 – 2400bps, 6 – 4800bps. A very safe, but slow option is 300bps.
L is number of bits, 7 or 8.
P is parity: N (none), E (Even) or O (Odd)
S is stop bits, 1 or 2.
C determines state of CtS/RtS, DSR and CD lines. For example is “B” ignoring CtS and CD, using DSR, RtS (high level), F ignores everything, only notifies the system by high level on RtS.
In our example the command: LOAD “COM0:(28N1F)” starts a connection with 300bps, 8-bits, no parity, 1 stop bit, no flow control.
Since we have deactivated the data flow control, the serial connection works in the “fire and forget” mode. I.e. there is no check whether the data has arrived at the destination. Therefore no progress is shown during the data transfer. Only when everything has been transferred, minicom displays a termination message. After that, the BREAK key can be pressed on the HX20 to end the data reception as well. LIST should now show the program listing of the software. If the data transmission is interrupted in between, the HX20 acknowledges this with an error message. Here you should check the connection parameters or the cable again.
Soon I will also test a full featured serial cable which supports higher data rates and report here. Here is the pin assignment of a “full featured” cable:
Source: http://geocities.com/abcmcfarren/hx20/com0.htm